Look at an engraving, a botanical plate, a 19th-century newspaper illustration.
The illustration has shadows, volume. You can make out different textures and gradients.
But if you look closer, you will see there is not a single grey in it. There is no blending, no flat colour. It is all lines.
Thousands of parallel and crossing lines. Closer together in the darker areas and further apart in the lighter ones. The whole drawing is made with them.
Dürer, Rembrandt and Goya, among so many others, used this technique in their work.
It is called hatching, and it is a fun technique, a cheap one, and perfect for starting to draw.
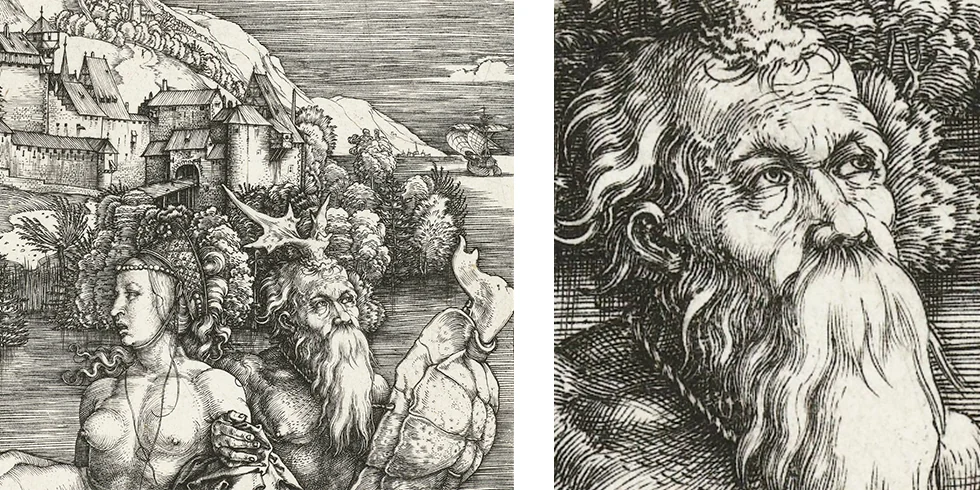
On the right, an enlarged detail where you can see the lines that make up what looks like grey from a distance. Albrecht Dürer, “The Sea Monster” (c. 1498), engraving. Rijksmuseum, Amsterdam — public domain.
How does it work?
Draw the outline of an object and then fill it with lines, from further apart to closer together, to give it volume. The tone depends on how close or far apart the lines are. Closer together - darker. So it is worth starting to draw from the lightest parts and darkening the drawing as you go.
And that is it. Everything else is a variation on this idea.
Why start with hatching?
Hatched drawing has several advantages and differences compared to other techniques:
· Losing the fear of drawing. Hatched lines are not erased or corrected. If you make a mistake - you carry on. There are so many lines that a mistake is immediately covered by other lines and ends up barely visible.
· Training your hand. The repetitive gestures of drawing the lines are perfect for controlling your hand and your stroke. The progress shows with every session you do. The lines come out straighter, the spacing is more even.
· It relaxes the mind. The strokes require attention and care. You concentrate on the drawing, your mind clears and everything else disappears. For some people, drawing with hatching is a relaxation exercise too.
A single tool
A ballpoint or a fine-tip pen - that is all you need to start drawing with hatching. Apart from the paper, of course.
As you go along you will get hold of different line widths. A fountain pen, maybe. But all of that is extra. With a ballpoint or a marker you can make very complex and complete drawings.
There are even exhibitions by people who only use a blue ballpoint pen in their drawings.
A plain biro.
Stroke over stroke. Layer over layer. The drawings turn out exquisite and each one of them carries the unmistakable style of its author.
What types of hatching are there?
There is a huge number of types of hatching and you can create your own.
The most basic ones are:
Simple hatching. Parallel lines in a single direction. By adjusting the weight and the spacing of the lines you create lighter and darker areas.
Crosshatching. The most popular hatching and the most versatile of them all. It consists of layering simple hatching crossed over itself. The greater the density of layers, the darker the areas turn out.
Contour hatching. The lines curve to follow the shape of the object. It is an ideal technique for giving a sense of volume to organic shapes.
Stippling. You create textures and shadows with dots instead of lines. Greater density of dots - the darker the area you are drawing turns out.
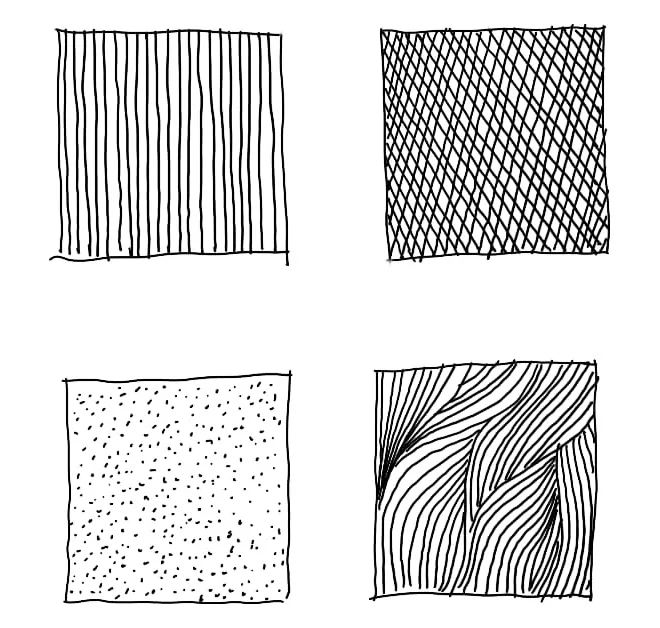
Four squares with the four types applied at the same mid tone. Top, simple hatching and crosshatching; bottom, stippling and contour hatching.
Some basic mistakes
If you do not make mistakes, you will not improve. But it is important to recognise them.
Little hooks or curves at the end of the straight stroke. The hand lifts too late. Lift the tip of the pen right at the end of the stroke. With practice it will come out automatically.
The spacing wanders. This is the most typical mistake and the one that practice fixes. The gap between the lines varies unintentionally and as a result you get darker or lighter areas.
You press harder to darken. A pencil reflex. In hatching you darken by closing the gaps, never by pressing.
You start with the details. Even though there are expert draughtsmen who can start a complex drawing from a detail, if you are starting out, you want to block in the shape first. Break the object down into basic volumes and start defining the outline.
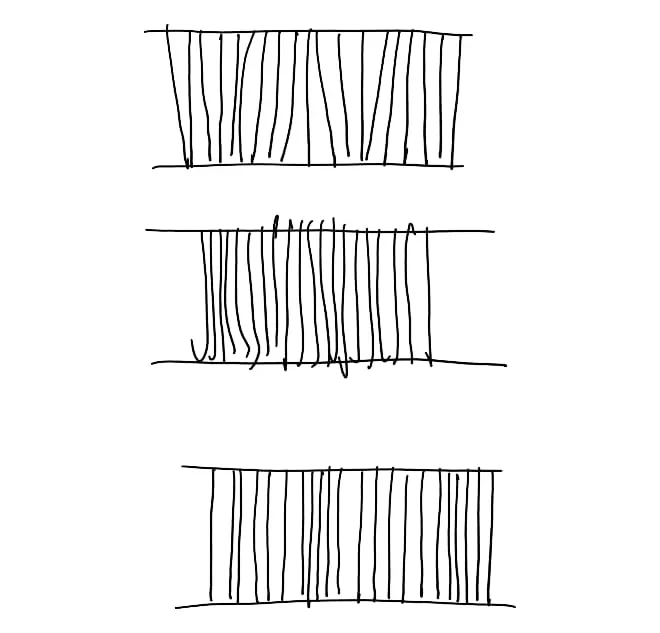
Real practice rows with the mistakes. In the first two, hooks at the end of the stroke and spacing that wanders; in the third, a more even spacing.
The exercise: four gradients in ten minutes
This exercise is ideal both for those who are starting out and for the more experienced. It works for starting to control your hand and as a warm-up before making a drawing. Do it several times and keep the progress. You will be surprised how fast you are improving!
- Draw five rectangles 3 cm tall by 5 cm wide in a row.
- Leave the first one blank.
- Fill the remaining four with simple hatching, all in the same direction, closing the gaps a little more each time: the second very open, the fifth almost closed.
- Without pressing harder on any of them. Only the spacing changes.
- Step back a little from the drawing and look at it through half-closed eyes.
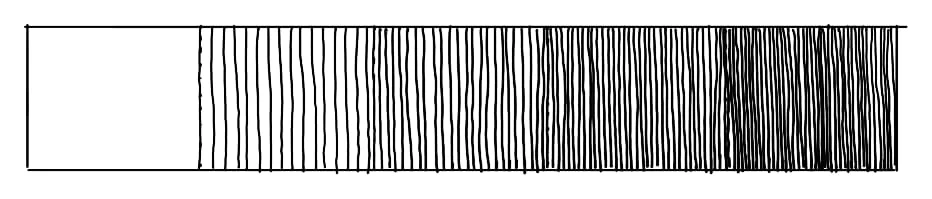
The five-value scale: the first rectangle blank and the next four with the spacing closing up each time.
You will see the tone getting darker as you reach the last rectangle. If two neighbouring rectangles look like the same tone, you did not open up, or did not close, the lines enough. If you see a big difference between two neighbouring rectangles, you overdid it.
And above all, look at how even the spacing between the lines is. That is what will give you a uniform tone.
Repeat the row three times in a row. On the third one your lines are going to come out straighter without you thinking about it. That is motor control, and it arrives sooner than you think.
Frequently asked questions
Does it work digitally? Yes, and it transfers in both directions. With a fixed-size brush and the stabiliser turned down, the exercise is almost identical. With the stabiliser turned up it does not: the software does the work you were going to train yourself.
Can you hatch with a pencil? You can, and eventually you will. But while you are learning, ink forces you to do it properly.
Hatching or shading? Both terms are used. Here we say hatching, and crosshatching when layers are superimposed.
You have the row of five squares in front of you. And now the question: is the spacing really even, or does it only look that way to you because you are the one who made it?
That is what is hardest at the beginning, and it is exactly what Sketch Hero does: you do this same exercise, and it tells you what is wrong and what to adjust on the next one.